
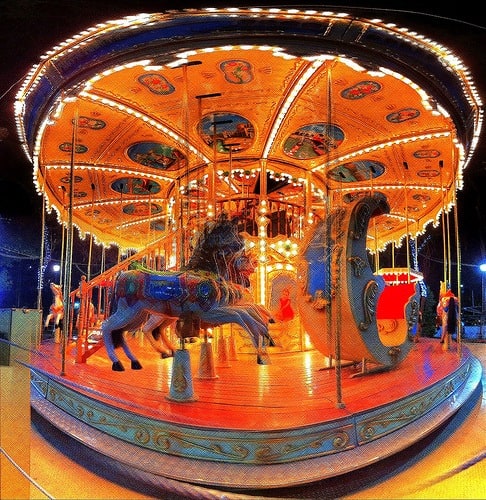
“Magia de D.F.” ~ Mexico City © 2011 Skip Hunt
You don’t need a camera bag full of gadgets, lenses, and tripods to get interesting, creative results. With a little thinking outside the box, all you need is a smart phone and a cool app or two. Read on to find out how working with the minimum of what you’ve got can actually enhance the creative process. The method discussed is also intended to further emulate human “seeing” and take a viewer even deeper into a shared experience at home or while traveling.
I recently backpacked in Mexico and wanted to experiment with getting my load as light as possible. And yet, I also wanted to be able to express myself creatively from the road without limitation.
Another desire was to be able to show and share how it feels to be in a particular place and a particular time frame rather than simply a split-second snapshot.
The solution was to play with using various panoramic image apps to capture many images of a given scene. Of course everything is moving and changing so perfectly matched-up compositions are impossible. However, I found the blurs between different segments of a given scene gave the viewer more of an impression of what you might see in a stretch of time rather than an instant. No one sees that way anyway. When you see, you focus on this or that and the rest gets blurred out in your perception. You don’t completely take in a complete scene in an instant. Instead it’s a series of images that “caught your eye” over a few seconds.

“ALFA” ~ Veracruz, Mexico © 2011 Skip Hunt
This method of using stitched panoramic techniques sort of approximates the natural process of “seeing” a given scene completely or emulates it nicely. You can do this with a simple iPhone and one of the many panoramic apps. Or, you can also do the same thing by taking several photos with any camera and stitching them later with desktop programs.
For my experiment, I wanted to see what I could do on-the-spot and “live”. So this is one of my favorites using this technique. In some ways, I feel it shows my perspective and impression of a given scene better than video can, because with video you’re free to look at the whole scene as you please getting your own impression. With this method, the photographer acts as more of a director of the viewing experience… directing what he/she feels is most important or made the biggest impression while standing in a given spot in place and time.
For the “Magia de D.F.” and “Alfa” images above, I used only an iPhone 4, the Autostitch app, and the Iris photography app to punch up the color and add a little texture.
You can see more Skip Hunt travel photography in Mexico with only an iPhone here.
 iPhone gets HDR Photos
 My Shot Lists for Travel – iPhone App for Photographers
 National Geographic Traveler Photography Seminar
 Finding The Best Camera for Travel Photography
by Skip Hunt
Skip Hunt is a Photographer and Visual Artist. You can find his work at kaleidoscopeofcolor.com and skiphuntphotography.com.One Response to “Photography Tip: Creative Travel Photography with an iPhone”
Leave a Reply
Tags: article, iphone, photography, photography tip, travel photography


Fred Lusk
Says:March 18th, 2011 at 6:13 pm
I would like to suggest two additional aps, one that is technical and one that is fun.
The technical ap is DOFMaster, which will calculate the useful depth of field and hyperfocal distance based on camera, lens, f/stop, and focus distance. This is handy for when you do lug the big camera around and you want to know the DOF. There is also a version of this program that I use on my Palm TX.
The fun ap is TimeLapser, which creates time lapse videos. I have used this in airports, on a small cruise ship in Alaska, etc. and it works really well. Best results would come from mounting the iPhone on a tripod with a special bracket (available, but I don’t have one). However, it’s easy enough to brace the iPhone on a table or a wall.